22 Feb 2013

Floppy Bow Headband

{a simple craft project}

I’ve made a few headbands for my daughter as they are quite quick and easy to make and always much nicer or lets say different than those you can get in the shops. And if you ask my girl she’ll tell you than one can never have too many headbands.

 
So today I decided to make her a floppy bow headband and it just happened that I had a golden plastic headband that I had just purchased on the sale from Accessories and some golden fabric which I got in preparation for future princess dress sewing.

The project is very easy and it took less than 30 minutes, including waiting for my glue gun to warm up. So if you are a new to sewing or crafting this is an ideal way to start – make something quick and easy that you or your child can wear.

Below is a photo tutorial which is more or less self explanatory but here is a little summary:

You will need:
A headband
Matching Fabric
Glue Gun

Cut two pieces from your fabric. You can decide how big (or small) you want you bow to be. In this case big is good!

Turn your bow piece back to front and fold it in half and stitch each side leaving a 2cm gap in the middle. Use the chop stick (or something similar) to turn the bow to the front.

Sew your small piece together. It will be used to make the middle part of your bow.

Next set your sewing machine stitch length to 5 and sew a line through the bow piece so you can gather it.

Use your hot glue gun to attach the bow to the head band. Use the smaller piece to finish of your bow by also gluing it to the headband.

Very easy!

 
My little girl said that this was now here favourite headband…but she says that every time.


 Have a crafty weekend!

Love,
Irina xx

16 Feb 2013

Paper Covered Tin Cans

{ a 10 minute project }


Everybody is doing beautiful fabric or paper covered cans and boxes to mach their beautiful craft rooms and so I decided to have a go myself...no, not at having a beautiful craft room ( sigh), just at covering some cans with paper. 

It is all very much pretty straight forward...however I would like to introduce you to my second best friend ( after my hot glue gun) ...please enter the double sided tape...yes, it has proven itself useful on many occasions and now I just can't imagine not having one...it did a great job with those cans too.

The other slightly different thing that I did was to keep the clear plastic lid and use one of the tins to store my roll of jute twine...it worked lovely and it is so very easy to pull.

So here is what you need and a simple photo tutorial.

Paper - mine was double sided
Cans
Double sided tape
Ruler, mat and an exacto knife


My double sided tape is a bit thick so I cut it in half and used it to attach the paper to the back of the cans. If you have thinner double sided, tape than use one strip to attach each paper end.

About the little wooden stick you see on the photo - I planed to hot glue it to the bottom of the can but at the end it wasn't necessary...as you can see below.


Have a fabulous Sunday!

Love,
Irina xx

14 Feb 2013

Pom pom monster wands


{ a craft lesson}

Lovely Little Big Daughter invited two friends yesterday to learn how to make pom poms. The inspiration came from the tulle pom pom wands that I made as favours for her Birthday party and so everyone wanted to know how pom poms are made.

 
The girls sat patiently and waited for me to cut the circles and show them how it’s done and although I was worried that the needle might be too big all went fine and everyone had fun. 


I wasn't sure what to do with the finished pom pom so at the end we just added some spiralled pipe cleaner ( I only had white left from Christmas, a colourful one could have been probably better) and glued ( I used my hot glue gun) some wiggly eyes. I suggested using a big and a small eye to make the monster funnier but the girls didn't think it was such a good idea. Than I glued the pom pom to a paper straw, hence the pom pom monster wand name.


I haven't provided a tutorial on how to make the pom poms because I am sure you know already and I bet there are plenty of tutorials on the net . This is just an idea of a craft activity with your five year old (not necessarily, but I think five would be the minimum age) and let me tell you, the girls were so proud they made their own pom poms.


 Hope you are having a great week!

Love,
Irina xx


12 Feb 2013

Shrove Tuesday

{ hurrah for pancakes} 

You didn’t forget it was Pancake Tuesday today didn’t you?
  
I must share this recipe with you. It makes the fluffiest most delicious pancakes I’ve ever tasted. Egg whites are beaten separately and than are gently added to a ricotta and flour mixture to create the yummiest little ( at least I make them little) pancakes. Technically they are called hotcakes but in our house they are always referred as pancakes.

The recipe belongs to the famous Australian chef Bill Granger but it was passed on to me by some dear friends coming from the Land Down Under. Apparently they have the hotcakes for breakfast every Sunday! What a great Sunday tradition I would say.


Ricotta Hotcakes ( Pancakes)

Ingredients:
250gr Ricotta
¾ cups milk
4 eggs, yolks and whites separated
1 cup plain flour
1 tbs baking power
a pinch of salt
50gr butter to cook them in

Preparation:
Combine Ricotta, milk and egg yolk together in a bowl.
Sift flower, baking powder and salt into another bowl.
Add together and mix until just combined.
In another bowl mix the egg whites until stiff and than gently fold into the other mixture.
Heat butter in a pan and drop about two tablespoons of batter per hot cake ( I use one tablespoon per hot cake).
Cook on low to medium heat until golden.

Eat with maple syrup, bananas, kiwi, blueberries or Nutella.

Hope you had a great Pancake Tuesday!

Love,
Irina xx

11 Feb 2013

Love is all you need

{ a DIY heart stamped card}

I have seen Valentine projects all over the net. And although Valentine’s Day seems to be a big thing in America, with generally showing your love to all, here in Europe it is still very much an occasion of showing love only to that one very special person in your life.

There are a few days left to Valentine’s Day and you have plenty of time to put together and nice card or /and some chocolates. And what better way to show your love than with something that you made yourself.

So here is a very simple idea for a heart stamped card…it took no time at all!

  You’ll need:

A smiley baby ( optional) - check out those four teeth, what a cute grin!
White card
Exacto knife
Champagne cork (you do have a whole jar where you collect them for craft projects, don’t you)
Water colours and brush plus some water


Draw a heart on the cork and cut around it using the exacto knife. Use the brush to apply first red than pink colour and start stamping the card. Wait a few minutes until the red hearts are dry and than stamp the pink hearts. Repeat once or twice so some of the hearts overlap. I stamped more hearts on the bottom and fewer in the middle and top part of the card.

Another simple idea is to put washi tape around tea lights and display them around the house. Pink and red washi tape would off course be perfect for the occasion.


And have your tired pink Tic Tac ? It can't replace chocolate but it is strawberry flavoured and actually quite yummy.

Wishing you all a lovely Monday!

Love,
Irina xx

9 Feb 2013

Iron Pearls Gift Tag


{ we can't get enough of iron pearls in our home...}

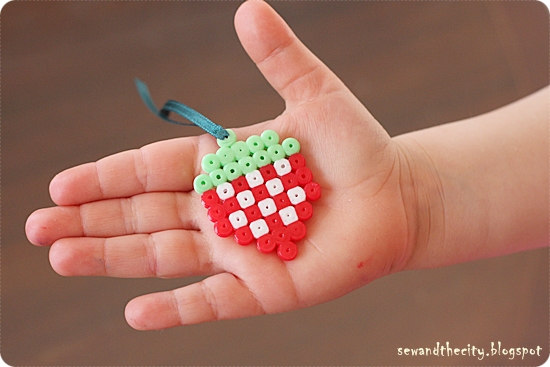
Lovely Little Big Daughter recently discovered iron pearls and absolutely loves them. I like them too...I mean what's not to like? My child sits still and quiet for half an hour, concentrating and developing those fine motoring skills while creating something pretty, usually to give as a gift to mummy.

And so this morning, just after breakfast, still in our pyjamas came the request for iron pearls...and so I looked on Pinterest where I have been pinning some simple designs and we agreed on a little sweet strawberry. And since Lovely Little Big Daughter was getting ready to go to a birthday party we decided to make one for the birthday girl.

But as much as I like the finished items I always found them a bit useless...its good fun while making them but you can’t really do anything with them afterwards. And so a little idea came to my head and I decided to add thin ribbon to the top bead and create a tag. All i needed was a big needle. It was easy, quick and made the gift look that extra bit special!


The pink strawberry can be found here and the red one is a little creation of mine.


Lovely Little Baby is awake now and it's time to go to the shop and get the ingredients for a Clementine cake I would like to try. Yumm! Can’t wait!

Have a lovely weekend!

Love,
Irina xx


8 Feb 2013

Rainbow Birthday Party


{ and the magic of being five}

Its official...I am now the proud mum of a five year old...yes, I need to repeat that as it somehow doesn't seem to sink in...five year old...where did the time go?

Lovely Little Big Daughter had the time of her life last week when she celebrated with not one but two parties. The first party, quite impromptu, included all of her Kindergarten group mates who paid us a visit as a part of a special project. During the whole month of January the group visited each other houses and we were the last to be visited and so it happened to be my girls birthday, so we celebrated!

 And so this year the special theme request was Rainbow...i didn't realise how easy I had it last year when the colour of choice was pink...this year was much more challenging...but much more fun to make and it looked so pretty and colourful...

I made paper rosettes for the wall decoration as I have seem them on other blogs and always wanted to make some but had no real reason...and off course no rainbow party would be complete without a rainbow cake...and it was a big hit especially as everyone thought it was a plain vanilla cake...until I cut the first slice...

I need to add that all of the paper rosettes are made from wrapping paper. Especially for a rainbow display you need many different colors and mixed and matched - for example the red color is made of red polka dot and plain red and the purple is made of three different purples one which is shiny and one which is glitter.
So yes, wrapping paper works really good and there are so many choices you just need to be careful not to buy the too thin one.
Once you have folded one or two rosettes you get a feeling as to how it works and do not worry if you folds are not too precise. Try your best and I can tell you no one would notice.
As it was a wall display I found that laying the rosettes on the floor allowed me to see how they'd look on the wall. Once I was happy than I attached the rosettes one by one to the wall keeping as much as possible to my original floor layout.
With rosettes everything seems to work. You can leave space between rosettes or you can use smaller rosettes to cover gaps and hold bigger rosettes in place. The smaller rosettes are really quick to make and you can leave those for the end.
I tied up the folded rosettes with twine and left long (er) ends which I than tied up to make little hoops to hand onto the paper pins. The smaller the hoops the harder to attach to the wall but your rosettes will lie almost flat on the wall so it will look better.


For her "proper" birthday party Lovely Little Big Daughter invited nine friends...I didn't make a second birthday cake...the second time round a settled from rainbow decoration which my little girl did alone...a total proof how big she is...

I also made some cake pops...the mandatory popcorn served in inverted cup cake liners...there were also lots of M&M's , cheese sandwiches, melon, cucumber slices and finger bite sausages...the girls were not too interested in the food...they couldn't wait to have their faces painted and play rainbow fairies with their magic wands...


 And here is what each little girl took home - a rainbow magic wand, a rainbow head band and a rainbow crayon...the girls loved them ...
I can't believe I forgot to take a photo of all the magic wands together...they were so pretty and colourful...


Lovely Mum visited from England for the special occasion and I went a bid mad ordering things so I got some nice crafting supplies...
I love the Union Jack cupcake papers and those cheerful paper straws which I have been seeing all over American blogs but which you can't buy here in Germany...
The circle cutter was used immediately to cut some circles for the rainbow party and I can’t wait to use the paper and the butterfly cookie cutters for some type of crafting around Easter time...
Nope, there are no good food colours here in Germany and also no Skittles (although I recently saw some little boxes at the cashier desk in my local Rewe) so mum had to bring those too. The food colours were great and I used them for the Rainbow cake and by the looks of it they will last for a long time.


The day after her birthday, while brushing her teeth in the morning Lovely Little Big Daughter said to me        "Mummy, yesterday was the most beautify day in my life!"...Aaahhh! I love you so much, my little girl!


 Have a lovely weekend!

Love,
Irina xx

P.S. If you are planning a rainbow birthday party than check out my board on Pinterest...there are some great ideas and also links to the free printables that I used...