28 Dec 2012

Rapunzel, Rapunzel let down your hair

 { my first ever princess dress}

Hope you all had a lovely Christmas with your family and friends and some time to relax and dream up future sewing and crafting projects! I certainly had a nice time and the privilege to see the eyes of a soon to be five year old girl light up with excitement when she whispered “ Mummy, Santa was here…come!” ...

A Rapunzel dress was on the wish list and at first I was looking to buy one but my google search brought up an expected amount of home made creations that I thought “ Oh my, I’ll make one…!”

Well, let’s say it was easier said than done. I didn’t buy the pattern from Simplicity and for a first time costume maker maybe I should have done. Next time! Yes, that’s right; even without the pattern I had so much fun making it than I am just waiting for the next request for a princes dress.

It was also my first time sewing non cotton fabrics and if you ask my craft  friends they’ll tell you that I avoid non cotton fabrics…I don’t even use jersey, so this was a real challenge, not to mention the organza fabric…

Here without further ado, I present you the Rapunzle dress…


And you can’t have a Rapunzel dress without a Rapunzel hair…so 1km ( yes, you are reading that correctly 1 kilometre- it was written on the label) of yellow yarn and some plastic flowers later and here it is…


Let’s just say that Lovely Little Big Daughter was delighted!


For obvious reasons ( I didn’t know what I was doing most of the time),  I don’t have a tutorial but a number of times I looked at this tutorial from Make It Love It - it's absolutley great! I can just say that it wasn’t so hard to sew those satin fabrics together and if you’ve never tired it than you should give it a go – never thought I’d say that.

In the next few days I’ll start preparations for a Rainbow birthday party. I love to throw myself a challenge and I have been busy pinning and dreaming up rainbow projects.

Have a lovely weekend!

Love
Irina xx


23 Dec 2012

Merry Christmas

and a Fantastic New Year!


With special wishes for a lovely festive time and a fabulous year ahead!

Love
Irina xx

21 Nov 2012

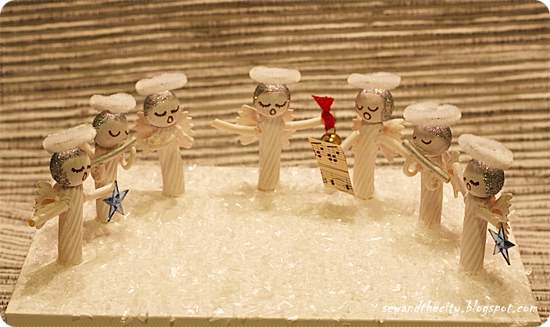
Pasta Shapes Angels

{who said that pasta was only for eating}

I know I promised a sewing post,  but I am still trying my hands at various non sewing crafts, and I am sure you’ll forgive my non-sewing-ness when you see these absolutely cute little pasta shapes angels. The idea is not new, and it is definitely not mine, I only added the glitter hair and the halo. Here is the tutorial if you want to make your own.

To make the glitter hair, lightly brush glue over the “head” where you’d like to have hair and than sprinkle some glitter. Tap gently to remove the excess glitter. As the head is made out of a wooden ball there is a little hole on the top. I used a white pipe cleaner, which I pre-folded and than inserted in the hole after I was finished with the hair to create the halo.


Lovely Little Big Daughter and her Lovely Creative Friend had fun painting some angels the day before and although they were not allowed to use the hot glue gun (did I ever say that everyone should have a glue gun? OK, I did!), they though it was great fun.

We gave the little group of Christmas Carols Singing Angels toLovely Little Big Daughters kindergarten and as they recently learned about Italy, it was interesting to see that pasta is not only for eating…


How are your Christmas preparations going?

Hope you are all having a good week!

Love,
Irina xx

1 Nov 2012

Halloween Cake Pops Party


We had a lovely Halloween party yesterday…Lovely Little Big Girl and her friends had a lot of fun…they had their faces painted, run down the street scaring people and generally behaved like cheeky little people who have eaten way too many sweets.

I decided to give myself a little challenge and had a go at making cake pops. I’ve always wanted to make cake pops but thought they were too complicated and so always left it for next time. Oh, I should have tried ages ago…they were so easy to make and they were delicious. I mean you can’t go wrong with a chocolate cake pop, dipped in chocolate and than covered with chocolate sprinkles, can you? No not really!

So I won’t bore you with more details, here are a few photos…


Sorry I have used the flash on most photos. I have a new camera, well new to me and still trying to find my way around.

And here is Lovely Little Boy. He is already four and a half months...I know, time just flies by!


By the way he is wearing a little outfit which I made for his sister when she was nine months old. Although the Pumpkin costume is made from a Halloween bag and an old Zara t-shirt, it has a special santimental value for me…it was the very first thing I ever made using my sewing machine…and so that’s how it started…my love for sewing!

And so I am making a point here. I know it is a sewing blog (originally, hence the name) so I promise to do more sewing projects alongside my ever expanding crafting horizon ( smiley face).

Hope you are having a good week!

Love,
Irina

27 Oct 2012

Halloween Pumpkin Wands

 { Back for good }

I am back and I am so excited.  It feels like life is back to normal (although that’s not entirely true), but what a good time to be back.Next week is Halloween and than it will be time to get ready for Christmas – my favourite time of the year, so I am really looking forward to making stuff, and this time I have a little helper – my four year old girl is showing great interest in crafting ( or so called basteln in German)…that’s my girl!

So this morning the children and I woke up to see that outside was snowing…well, it is only October! But what a good excuse to stay home and do some crafting. Lovely Little Daughter will have some friends around on Wednesday to celebrate Halloween, so I thought I’d make her a Pumpkin Wand and she requested another one for her best friend.

I have not bloged since a few months so it took me 10 min to find my sewing machine cable and than it turned out that both of my cameras had no battery left, luckily I knew where my hot glue gun was…so I need to blog more often.

An hour and a half later and here is what we came up with…


I have already made magic wands for Lovely Little Big Daughter's birthday this year and here is a step by step tutorial that you can follow to make these pumpkin wands.


You will need:

Wooden sticks
Black ribbon
Orange ribbon
Orange felt for the body of the pumpkin
Green felt for the stem (there is a harder variety)
2-3 types of other matching ribbon to decorate
Plastic spider or some other kind of Halloween paraphernalia (optional, but it did help to cover the front of the wand)
Hot glue gun

I looked up on the Internet for pumpkin colouring pages just to get an idea of the shape and lines of the pumpkin and that drew one on a piece of paper in the desired size. I used a water soluble pen to outline the pumpkin on the orange felt.

The pumpkin is machine stitched with a black double stitch (what I mean is that I stitched once and than I stitched one more time – no need to be precise). 

TIP: Make sure you stitch the middle two lines only two thirds otherwise there will not be enough space to insert the stick. Do not forget to include the grren stem before stitching.


Wishing you a lovely weekend...

Love,
Irina xx

7 Aug 2012

Taking a break

{the ups and downs of life, and the importance of being true to one self}

My dearest readers, 

Yes, I know that this is a sewing blog…but sometimes things happen in our lives which we have not wanted or expected and which we don’t know how to deal with…which we have consciously or subconsciously contributed to…which are confusing to the mind…unexplainable to the heart.
I feel like I have been hit by a falling star and I feel that I need to take some time off to reflect on the important things in life and concentrate on my family so I will not be posting for a while.
I hope that my inspiration comes back soon together with all the positive energy and happiness needed to restore the balance in my life.
Have a happy summer! 

Love,
Irina xx

2 Jul 2012

Zippered purse

{leaving gift}

Today is the first day of the summer holidays here in the state of Hessen. Frankfurt already feels a bit emptier and calmer than normal, and judging by the available parking spaces on our street I guess quite a few people have taken advantage of the holidays and left the city. What I mean by “taken advantage” is that school children are not allowed to take time off during the school year so everyone goes on holiday at the same time - but you knew that already right…I didn’t…my girl is still in Kindergarten so we don’t have to worry…but give it another two years, we’ll be part of the holiday crowd.

One of the teachers at Lovely Little Big Daughter’s kindergarten left and as a leaving gift I made her this little bag…I was given the size and also there was a request for flat bottom and two pockets inside (sorry no photo of said pockets). I found a great tutorial for the bag complete with an instruction of how to make the pattern. I love it and you can check it out here at Sew Together.

 And just in case you are like me and are looking for new blogs to read than here are a couple of links to check out…
....Top 20 web design tips by Heartmade...
...Know and Tell crafts...by a 13 year old boy full of creativity...

Have a lovely week!

Love
Irina

27 Jun 2012

Pitter Patter

{a bundle of joy}

It has been so long since my last blog post, but I really have some lovely news to share. Over the past nine months I kept a little secret… a very special project was on the way… Our Lovely Little Boy was born three weeks ago and he is absolutely gorgeous. I can’t tell you enough how happy I am! I don’t come from a big family; I don’t have brothers or sisters and not many cousins at all, so it was so unbelievable to find out that we were expecting a second child…a little brother for our big girl, who is over the moon to be a Big Sister!


At the moment I am taking it day by day and just trying to come up with some sort of routine, but to be honest I really have no idea yet. And although I don’t feel like a first time mum I seem to have forgotten quite a lot. Obviously all the baby information from the first time was stored in some temporary memory storage in order to be deleted the minute the baby has moved into a new phase…because with babies everything is a phase, right… 
I didn’t make much for the new baby…at first I was tired, than I wasn’t in the mood, and when I eventually felt like making something my belly was so big that sitting in front of the sewing machine was a challenge on its own.
But since our little boy was born on the Queen’s Jubilee, I decided to make him a little nappy bag with the Union Jack - I wanted to make something with the Union Jack forever ( I used this tutorial from Flossie Teacakes, and I love how the zipper turned out). The bag comes together with a little changing mat, which was a real pain to make as I decided to use oil cloth on one side, only to find out that the machine foot just wouldn’t move. I quick Google search solved the problem, and I managed to finish the mat by putting a piece of tissue paper over the oil cloth and than sewing. Once finished I just removed all the paper – it was really easy, but I don’t think I’ll be using oil cloth any time soon. I also embellished a few muslin (burp) cloths with a patchwork border – they turned out quite nice.

 
Off to tend to my new born now, but promise to be back in a few days. 

Love
Irina xx

26 Apr 2012

Fashion Talks


{Apologies, rather long post and almost no photos}

Yesterday I met a friend and visited the “Fashion Talks” exhibition at the Communications Museum in Frankfurt, conveniently snuggled on the south bank of the river Main, just next to the Film Museum and the Architectural Museum. 

 
The exhibition, albeit small, was filled with interesting facts about fashion and raised important issues like globalisation, cheap labour, the boom of the DIY culture and the desire for individualism.

It was interesting to see a video about clothes created by a British designer that changed shape achieved by using a collection of cables, rods, motors, microcontrollers and batteries to transform the shape of a dress. I thought it was quite innovative – although the collection is from 2007.

We stared at tartans for long time and found out that there are as many as 10 000 different tartans available, both belonging to Scottish clans and also international or others created for various occasions. There is an Amnesty International Tartan, with the colours describing the multi-racial and international compass of Amnesty International's work. There is an Afghanistan tartan designed  to mark, but in no way celebrate the worldwide struggle against the opium industry.  There is even a German tartan for Americans with German Ancestors – yeah I know, unbelievable. One of the exhibits was tartan created after the death of Princess Diana. The tartan was beautiful and it was quite amazing how it really reminded of the late Princess.

 
The biggest part of the exhibition was dedicated to denim and jeans and as a big jeans fan, it was quite interesting to find out how Jeans were created and that LEE was the first brand to introduce jeans with zips. Levi’s produced a special pair for Coca Cola – which was pretty horrible I must admit.
However I was stunned to discover that before a pair of jeans reaches the shops it has travelled an estimated 50 000km backwards and forward between, Asia and Eastern Europe where various process have taken place, 8 000litres of water per pair have been used, and the average worker has received as little as 50c for their labour.


How sad that jeans, the very symbol of Western youth culture is now associated with sweat shops around the world and are produced by people who would have aspired to own a pair of jeans and who are themselves in their twenties, yet spending their youth working long hours, often in bad conditions for the pleasure of the Western society, respectively us. I feel so helpless!

There was a little bit on the subject of DIY, and it showed how clever companies have ventured into the whole DIY movement by producing items that can be customised like the Adicolour trainers below.


All in all it was a nice exhibition which provided a lot of information, raised a lot of questions in my mind and reinforced my belief in DIY.

After a nice bowl of soup it was time to go home and I had the opportunity to snap a few images of Frankfurt with its skyscrapers on the background of a glorious blue sky.


 Hope you are having a nice week!

Love,
Irina xx

23 Apr 2012

Frozen Yogurt Lollies

{switching to a healthy option}

 
I made similar lollies last year and my little girl hasn’t stopped asking for them. That time I used mashed watermelon, organic vanilla yoghurt and pureed cherries. This time I decided to go for an easier option and just bought three small packages of yoghurt – vanilla, strawberry and peach.

I used a plastic ice lolly mould and carefully poured a little of each yoghurt starting with the vanilla than strawberry and last the peach. The verdict was that they are “ So yummy!”


And here is the Summer Fruit Lollies post from last year…


Have a lovely week!

Love
Irina xx
  
P.S. Please see my Linky Party Fun page for all the parties I link up to.

This post was featured on:
 

18 Apr 2012

Fabric Flower Headband

{little gift for a girl in less than 30 min}

When I saw a beautiful head band at a lovely blog called Duni’s Studio I immediately knew what to make for a cute girl who just turned six, and who definitely doesn’t like princesses…I made a different version but the other headband is definitely worth a look..

I love this fabric flower, it is so easy to make and it involves only a bit of hand sewing and than sewing or gluing a button on top to finish it off. Here is how I made it.

 
You’ll need:

Cotton fabric
Thread and needle
Buttons
Plastic headband
Glue gun

Measure 2,5cm from the end of the fabric, make a little snip with the scissors and just tear a long trip from the fabric. Don’t worry about the fraying fabric, it looks actually quite nice.

Now you’ll need to measure and cut 5 little squares for the petals. My ones are 7cm x 7cm, but you can also make them bigger (or smaller for a hair clip).


 To make the flower, start with one of the squares, fold it in half and loosely baste the two short sides, as shown on the photo. When the first petal is ready continue with the remaining petals. Once you have all five petals sewn together just pull the thread to make the flower shape and make a few stitches to secure the flower.

Now its time to use the glue gun. Glue a nice button to the front of the flower. You can also sew the button, but I find it better to glue it.
Apply a little bit of hot glue to one end of the headband and wrap the long fabric strip diagonally. Tuck the ends in as nicely as possible.


 Now glue the flower to one side of the headband and you are done.


Hope you are all having a nice week!

Love,
Irina

P.S. Please see my Linky Party Fun page to see the parties that I link to.

This post was featured on:
 

16 Apr 2012

Spring Wreath

{upcycling the Easter decoration}

Now that Easter is over I had to take away the Easter wreath from the front door. I quite liked coming home to a bright and cheerful Easter wreath and now the door just looks plain and not exciting at all. So rather than stash the Easter decoration away till next year, I decided to re-use it and crate a new wreath.

Ta-da!


It only took a few minutes to make and you can find a tutorial for the Fabric Pin Wheels here. I also used my beloved stamps – they don’t get used often enough – but in the past I made some cute wall frames. Have a look at this post if you have a min. 

Our front door looks much happier now!

Wishing you a lovely week!

Love,
Irina xx
P.S. Please see my Linky Party Fun page to see the parties that I link to.