11 Jan 2012

Birthday Party – Part 1

{Gather your items}

Look what the postman brought for me today…a box full of goodies! Lovely! All ( well, almost all) the things I need to start preparing Lovely Little Daughter’s Unicorn Birthday Tea Party – a mere three weeks away.

I always like American birthday parties - OK, I think that sometimes they are a bit over the top but never the less all the colour coordination, and the themes, and the yummy ( not always healthy) food…it is just nice.

So I have thrown myself a challenge – to make a yummy looking buffet style table in white, pink and purple, to create some pretty room decoration, to make some little favours for the girls and…well that’s about it. Did I mention the cake and the food? And did I mention it is all on a budget? I already feel a bit overwhelmed and think I should have started before Christmas, but it is supposed to be fun, so I am not stressing about it.


Can you see my new Hot Glue Gun – I can’t believe I haven’t acquired one of those clever tools ages ago…I mean people have been using it for centuries, right…I can’t wait to give it a try.

Love,
Irina xx

10 Jan 2012

Home Sweet Home

{ Fabric Houses}

I wish I’d thought about that...fabric houses! How cute, very easy and yes, so addictive. I saw some fabric houses a couple of months ago and when Lovely Mum requested a key holder for her house keys for Christmas I knew what to make for her. Lovely Mum does not like small key holders, she has to look forever in her bag - so this one was just perfect.


I used a very easy tutorial from Retro Mama, although I made a few changes and actually indulged myself in some freestyle hand embroidery. The house is only 8cm high. 

For more cute fabric house inspiration check Mami Made It blog.

Hope you are having a creative start to the New Year.

Love,
Irina xx

21 Dec 2011

Merry Christmas

{and  a prosperous New Year}

Frankfurt woke up covered in snow yesterday morning but sadly today there is not sign of any snow...well there are still a few days left so I still hope for a white Christmas.

I just wanted to share with you some of the Christmas things I made ( mostly last year).
This year we had two Christmas wreaths - the first one, for the front door, I made this year by wrapping up a shop bought straw wreath with pieces of gingham fabric and adding (sadly also store bought) felt decoration.

The second one I made a couple of years ago and it is simply a thick plait consisting of three fabric tubes filled with toy stuffing. The tubes are attached at the top, hence the big ribbon to cover that. Last year I added florist's wire to make sure the wreath kept its nice and round shape.

I love our Christmas bunting. It was one of the first things I made four years ago when I first started to sew. On the gingham triangles I added and angel, a heart and a Christmas tree, using blanket stitch and it gives the bunting this slightly "country living" look.


It was my intention to provide a tutorial for this patchwork fabric covered bauble ( sorry, maybe next year, or  maybe a similar looking Easter egg :-).


Salt dough heart shaped cookies, adorned with fraying pieces of gingham fabric-  I made those two years ago and they still look lovely. I will make new cookies next year, as I love how nice they look on the three.


And off course our Christmas stockings - also made last year. 
This one is mine - lots of presents...


This one is for Lovely Little Daughter - we were living in London and the time so there are town houses, a snow covered path and street lights...


...there is even light in the street lights...


This one is for Lovely Husband and it was my first ever go at free hand machine embroidery. Beginners luck as they say...i never managed again.


And here is the so much anticipated Advent calendar...i should have simply gone for sweets and chocolate but with health in mind I decided to go for little gifts - honestly now I am not sure it it was such a great idea...my girl loves it...i feel she is getting spoiled. However it looked really pretty.


And now my dearest readers, I would like to wish to you and your loved ones a very merry Christmas and a fantastic and creative New Year!

Love,
Irina xx

22 Nov 2011

Back for good

 { I missed sewing)

My dearest readers,

I hope you’ll forgive my (almost) unannounced absence from Blogland… things have happened and I have been left without energy, with no creative vibes to keep me going…All is good, and in the next few weeks I will share more with you, and since my creative energy is starting slowly to flow back I even made a few things and attended a little fair last week.

I made some Christmas cards for the fair, and what a better way to return after all those weeks than by showing you a little tutorial of how to make those easy cards for your loved ones!

Machine Sewn Christmas cards


This is what you'll need for each card. Leftovers from green and red fabrics are really useful.


I find it easier to glue the red squares to the card with tiny drops of glue.  I also glued the purple ornament with a single drop in the middle.


Put the squares in pleace and let them dry.


Start making your tree by first sewing the trunk with a single short line.


The back should look like this. Pull the front thread to the back and tie small knots.


Stitch the rest of yout tree pieces and make sure each piece overlaps the previous so you can't see the stitch.


Prepare the ornament by stitching the ribon and the zig zag and than trimming them to the shape of the ornament.


It should look like this...or similar.


Attach the ornament to the card with a single tiny drop of glue and let it dry. When dry simply stitch the ornament to the card as shown below. Sewing surves on paper is not as easy as fabric, so you probably have to reposition the needle a few times to create a smooth curve.


The gift is easy...just straight lines on the sides and two straight lines inside. I forgot to take a photo of making the bow but it is simply sewing and stopping to reposition and make sure you are comming up with a  curve. Don't worry if both sides of the bow are not simetrical.


You could finish at this point or if you have stamps just wirte a little message.

Here you have them...hand made cards for your family and friends!


Oh, it is so good to be back!

Happy creating!
Love,
Irina

13 Oct 2011

Creative blogs

 {I hope you'll enjoy them as much as I do}

Hi, today I am a guest blogger at Roca and Co. I am a frequent visitor at Carmen’s blog as she has shared there some fabulous ideas. Please do go and have a look at Roca and Co – you have already seen my Autumn Dress tutorial, but have a little browse and I am sure you’ll find something to inspire you - I am particularly fond of her appliquรฉ ideas.

Carmen also has a weekly linky party each Thursday, which is gaining more entries by the week and it is also a source of many nice ideas.

And just to tickle your curiosity here a few of my favourites from Roca and Co.


Another lovely blog I would like to tell you about is Coconut Collier – it is written in Spanish but you don’t need to speak Spanish to feast your eyes on the lovely little creations that Nรบria makes ( and you can always use Google Translate :-). 

I totally heart her miniature felt broaches and key rings. Also Nรบria was very sweet to gave me an award a couple of weeks ago – thank you Nรบria, you are lovely!!!


Please forgive me for not posting so much lately. I have a little project in the making and I can tell you more about it soon.

Love
Irina xx

11 Oct 2011

Recycled Jumper Felted Dress

{loving autumn leaves}

We have been going to the park regularly to collect conkers and leaves– conkers are very important in the life of a three and a half year old, you know.  The more the better, they are used to cook with, as form of payment and even as treasures hidden in secret places, especially pockets. 

The leaves we collected were so lovely that I decided to make leaf appliquรฉ. An old felted jumper from my husband provided the fabric, so I decide to make a felted dress. This is the second piece of clothing that I have made from an old jumper. I love the fact that something which initially was heading for the bin can be reused; and also all those felted jumpers are made of 100% wool, so are sure to keep my girl nice and warm on cold days.
 
The dress was really fun to make and I can’t believe how easy it is to sew with felt. I am yet to clean my sewing machine – apparently felt fluffs a lot, so a regular clean is a must.

 
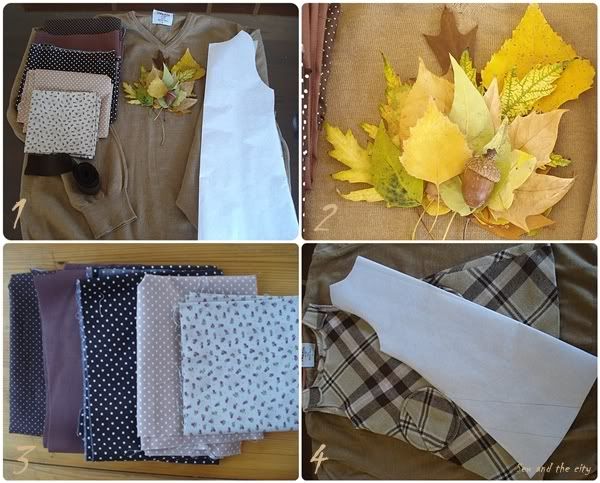
1-3 You’ll need – an old jumper, or other wool felt fabric, pattern, and scraps of autumn coloured fabric (I chose browns) and a nice selection of leaves to use for your appliquรฉ.
4. Make your pattern – fold and existing dress that fits in half and trace around it (adding seam allowance) to create a simple A line dress pattern.


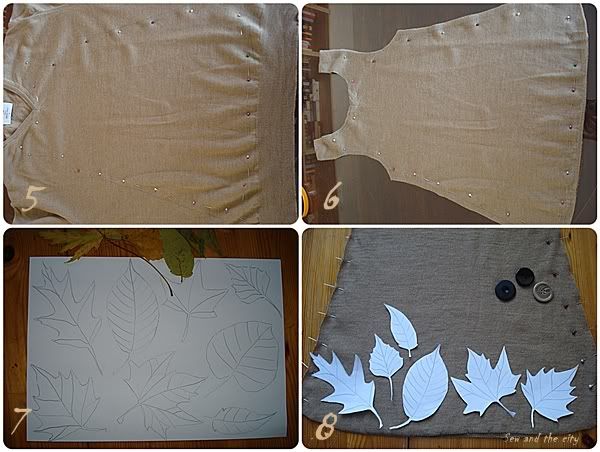
5.  Place the pattern on your jumper / fabric and trace with magic marker or water soluble pen. Cut the dress shape.
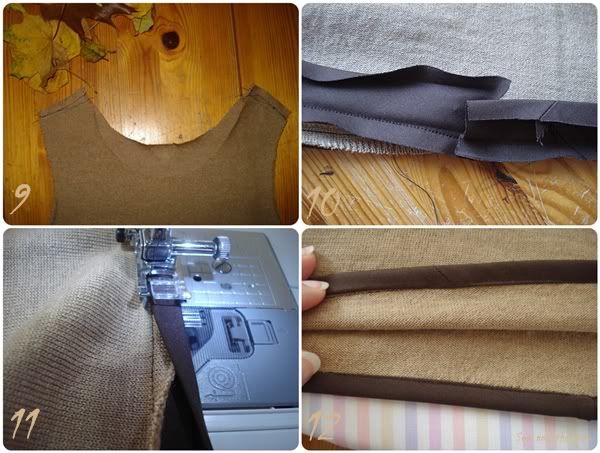
6. Pin and machine stitch the dress on the sides (I later wondered if it was better to stitch the shoulder bit – like in photo 9 and add the bias tape around the arm hole first and than sew the sides together – YES it is better)
7 - 8 Trace a selection of leaves onto paper and cut. Use Vlisofix or freezer paper to trace and iron the leaves onto your chosen fabric (photos 18 -19)


10-12 Add he bias tape – I first stitched one side of the bias tape to the back on the garment, and than fold it and stitched on the front – photo 11 – it gives it a very nice neat finish
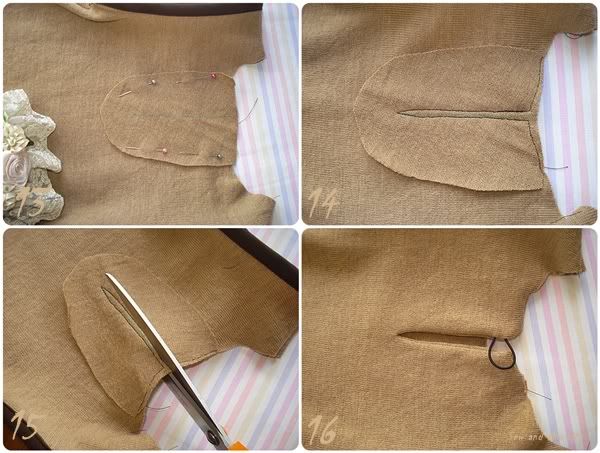
The button closure at the back was absolutely easy to make. I followed this tutorial – its fool proof.


Here it is - a very easy, recycled jumper dress!

Happy sewing!
Irina xx

4 Oct 2011

Late summer and fat free cupcakes

{ or a lot of appliquรฉ}


As a general rule I try to keep my bloging as a Monday to Friday activity, so at the weekend I tend to keep a low profile. And this weekend was the last long weekend before Christmas and we were really lucky to have a very warm and sunny start to October.

Here are a few photos taken in the park yesterday. 

Can you spot the little dragonfly patiently waiting for me to take a photo?


Lovely Husband and I were lucky to sit in the park, guilt free, for 3 whole hours on Sunday afternoon while Lovely Little Daughter was enjoying herself at her best friend’s birthday party. I didn’t know that even three year olds have best friends…

As a gift for the lovely birthday girl, I made a name cushion. Names cushions are hugely popular here in Germany and people really love them. I was told that the birthday girl liked colourful pink so here is what I came up with.


I enjoyed making the cupcakes so much that when I finished the cushion I had to make a cupcake appliquรฉd t-shirt for Lovely Little Daughter. 


And as it turned, one t-shirt was not enough so I made another one….and here is the verdict…I absolutely love appliquรฉ embellishments.


Off to read blogs now...

Wishing you a creative week!
Love,
Irina xx