14 Jan 2013

Washi Tape Box

{ a way to organise your craft supplies} 


If you need a little box to store all of your washi tape or colourful cello tape than head no further than your local bakery. It doesn’t have to be Ladurée, as long as they sell macarons the chances are they will be given to you to take home in a little fancy box often with a clear window to showcase what’s inside.

So bring the box and the macarons at home, make a cup of coffee and take pleasure in eating the macarons than choose some nice wrapping paper and enjoy the rest of your coffee ( semi) decoupageing the lid of your box. I say semi-decoupageing as I actually didn’t apply glue on the top of the paper as I liked the mat finish. It took about half an hour and here it is my own little washi tape display box.


Wishing you all a lovely week!

Love,
Irina xx 

12 Jan 2013

Rainbow crayons

{may the rainbow party preparations begin}

So the rainbow tule and ribbons arrived in preparation for the Big 5 Rainbow birthday party. My world is now full of colour and I think I have pinned every single rainbow party idea available out there...

I would think it is appropriate to start with the invitation yet I decided to indulge myself in some long overdue crayon melting. I have seen those colourful crayons all over the net but never really tried them so without wasting a second I pulled out the pile of broken crayons and some old glass dishes left from eating too many Gü puds ( What you have not heard of them? You must try them immediately they are just divine…and no, they are not paying me to say that).

However I didn’t want to come up with a colourful crayon, I actually wanted a Rainbow crayon. And so I separated the broken crayon pieces into colours and melted them separately – one after the other to be precise. I followed the colours but I didn’t mater if I started with red or blue as I didn’t have a front or back side. 

I also used an ice cube tray from Ikea as a mould and left it on the balcony as the weather is quite cold and so the melted crayon hardened very quickly. In the mean time the next colour was already melted so I didn’t have to wait long. I used a metal spoon (Note: plastic spook might melt) for precision and to pour the exact amount of each colour. Try and be as precise as possible and aim for the middle of your moulds to avoid melted crayon running down the sides of the moulds.

Since my crayons were done on the balcony at a temperature of 5C I didn’t have to wait long for them to harden but if you are some where nice and hot than make sure you wait as much you have too before adding the next colour and popping them out.

Well all in all it took less than an hour and it was real fun and not that messy. Having said that do wear an old apron if you have one and definitely put old paper to cover the place where you’ll be making the pouring.


Have a nice Sunday!
Love, Irina xx


3 Jan 2013

Headband holder

{a quick tutorial}

Happy New Year! Hope you all had a nice time over the festive period and didn’t spend too much time on Pinterest like I did. I do like Pinterest a lot, I mean a lot, but I noticed lately that I go to look at an old pin but end up spending hours pinning new pins and hence don’t have enough time to make anything.

So today I had a spare hour and decided to make something quickly for my little girl. I saw something like it on Pinterest but it was pinned from that new website Joybx.com and so it had no link to the source.

 
Well, if you have a girl you already know that even a four year old has as many as ten Alice bands. Yes, in pink, red, denim or glitter…you name it.

The headband holder was really easy to make and you’ll need :

some ribbon - all the ribbons I used were pieces left from other projects
a metal key chain ring
some kind of flower or glitter stone to embellish the holder
sewing machine
hot glue gun

  1. Sew both the top and bottom ribbon together
  2. Cover the metal ring with a ribbon – use the hot glue gun
  3. Turn the end of the ribbon where the two ribbons are sewn together and add the ribbon loop holding the metal ring. Sew in place.
  4. Use the top ribbon to make some loops and sew them with a straight and backwards stitch. I wasn’t too worried to make the loops the same size as some Alice bands are wider than others. Make as many loops as you need.
  5. Use the hot glue gun and attach the flower on the very top part of the holder and you are ready.
 
One of my New Year resolutions is “No More Bad Blog Photos” but I can see I’ve got a long way to go. Off to bed now with my new book “The crafters guide to taking great photos”, I’ve heard that it’s great.

Love
Irina xx

28 Dec 2012

Rapunzel, Rapunzel let down your hair

 { my first ever princess dress}

Hope you all had a lovely Christmas with your family and friends and some time to relax and dream up future sewing and crafting projects! I certainly had a nice time and the privilege to see the eyes of a soon to be five year old girl light up with excitement when she whispered “ Mummy, Santa was here…come!” ...

A Rapunzel dress was on the wish list and at first I was looking to buy one but my google search brought up an expected amount of home made creations that I thought “ Oh my, I’ll make one…!”

Well, let’s say it was easier said than done. I didn’t buy the pattern from Simplicity and for a first time costume maker maybe I should have done. Next time! Yes, that’s right; even without the pattern I had so much fun making it than I am just waiting for the next request for a princes dress.

It was also my first time sewing non cotton fabrics and if you ask my craft  friends they’ll tell you that I avoid non cotton fabrics…I don’t even use jersey, so this was a real challenge, not to mention the organza fabric…

Here without further ado, I present you the Rapunzle dress…


And you can’t have a Rapunzel dress without a Rapunzel hair…so 1km ( yes, you are reading that correctly 1 kilometre- it was written on the label) of yellow yarn and some plastic flowers later and here it is…


Let’s just say that Lovely Little Big Daughter was delighted!


For obvious reasons ( I didn’t know what I was doing most of the time),  I don’t have a tutorial but a number of times I looked at this tutorial from Make It Love It - it's absolutley great! I can just say that it wasn’t so hard to sew those satin fabrics together and if you’ve never tired it than you should give it a go – never thought I’d say that.

In the next few days I’ll start preparations for a Rainbow birthday party. I love to throw myself a challenge and I have been busy pinning and dreaming up rainbow projects.

Have a lovely weekend!

Love
Irina xx


23 Dec 2012

Merry Christmas

and a Fantastic New Year!


With special wishes for a lovely festive time and a fabulous year ahead!

Love
Irina xx

21 Nov 2012

Pasta Shapes Angels

{who said that pasta was only for eating}

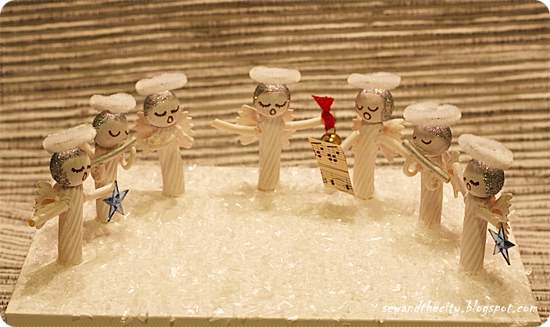
I know I promised a sewing post,  but I am still trying my hands at various non sewing crafts, and I am sure you’ll forgive my non-sewing-ness when you see these absolutely cute little pasta shapes angels. The idea is not new, and it is definitely not mine, I only added the glitter hair and the halo. Here is the tutorial if you want to make your own.

To make the glitter hair, lightly brush glue over the “head” where you’d like to have hair and than sprinkle some glitter. Tap gently to remove the excess glitter. As the head is made out of a wooden ball there is a little hole on the top. I used a white pipe cleaner, which I pre-folded and than inserted in the hole after I was finished with the hair to create the halo.


Lovely Little Big Daughter and her Lovely Creative Friend had fun painting some angels the day before and although they were not allowed to use the hot glue gun (did I ever say that everyone should have a glue gun? OK, I did!), they though it was great fun.

We gave the little group of Christmas Carols Singing Angels toLovely Little Big Daughters kindergarten and as they recently learned about Italy, it was interesting to see that pasta is not only for eating…


How are your Christmas preparations going?

Hope you are all having a good week!

Love,
Irina xx

1 Nov 2012

Halloween Cake Pops Party


We had a lovely Halloween party yesterday…Lovely Little Big Girl and her friends had a lot of fun…they had their faces painted, run down the street scaring people and generally behaved like cheeky little people who have eaten way too many sweets.

I decided to give myself a little challenge and had a go at making cake pops. I’ve always wanted to make cake pops but thought they were too complicated and so always left it for next time. Oh, I should have tried ages ago…they were so easy to make and they were delicious. I mean you can’t go wrong with a chocolate cake pop, dipped in chocolate and than covered with chocolate sprinkles, can you? No not really!

So I won’t bore you with more details, here are a few photos…


Sorry I have used the flash on most photos. I have a new camera, well new to me and still trying to find my way around.

And here is Lovely Little Boy. He is already four and a half months...I know, time just flies by!


By the way he is wearing a little outfit which I made for his sister when she was nine months old. Although the Pumpkin costume is made from a Halloween bag and an old Zara t-shirt, it has a special santimental value for me…it was the very first thing I ever made using my sewing machine…and so that’s how it started…my love for sewing!

And so I am making a point here. I know it is a sewing blog (originally, hence the name) so I promise to do more sewing projects alongside my ever expanding crafting horizon ( smiley face).

Hope you are having a good week!

Love,
Irina